
Walking Cane Adjustment Pin Explained: How It Works and How to Use It Safely


Emergency SOS Phone

Reacher Grabber Tool

Mattress Topper Memory Foam
Quick Answer
A walking cane adjustment pin is the spring-loaded button that locks an adjustable cane at a selected height. Pressing the pin lets the shaft slide, while releasing it into an adjustment hole locks the shaft again. Before walking, follow the correct cane adjustment steps and confirm the button fully projects through the hole.
What to check before using the cane
- Button visible: The adjustment pin should project completely through the selected hole.
- No shaft movement: Pull and push the shaft gently before placing body weight on the cane.
- Collar tightened: Tighten the locking collar if your cane includes one.
- Correct height: The handle should sit near wrist-crease height when you stand upright.
- No visible damage: Stop using a cane with a bent shaft, damaged holes, or unreliable adjustment button.
The small metal button on an adjustable walking cane looks simple, but it performs an important safety job. If it isn’t seated correctly, the cane shaft may move when you expect it to stay fixed.
In this 2026 guide, I’ll explain what the adjustment pin does, how to set it correctly, and what to check when it sticks or feels loose.
In This Guide
- What Is a Walking Cane Adjustment Pin?
- How Does a Cane Adjustment Pin Work?
- How Do You Adjust a Walking Cane Pin Correctly?
- How Do You Know the Adjustment Pin Is Fully Locked?
- Why Does a Cane Adjustment Pin Stick, Rattle, or Pop Out?
- Can You Repair or Replace a Cane Adjustment Pin?
- Adjustment Pin vs. Twist Lock: What’s the Difference?
- How Should You Maintain the Adjustment Mechanism?
- Frequently Asked Questions
What Is a Walking Cane Adjustment Pin?
A walking cane adjustment pin is a spring-loaded locking button located inside the telescoping shaft of many adjustable canes. It extends through one of several holes to prevent the two shaft sections from sliding.
Definition: The adjustment pin, also called a push button, snap button, or push-button lock, is the part that mechanically holds an adjustable cane at its chosen height.
Where is the adjustment pin located?
Look along the lower half of an adjustable cane. You’ll usually see a row of holes and a small rounded metal button protruding through one hole.
The actual spring mechanism sits inside the tubing. The visible button is only the part you press with your finger.
Which canes use adjustment pins?
Push-button height adjustment is common on aluminum single-point canes, offset canes, quad canes, and many folding canes. Some models combine the button with a threaded locking collar.
- Standard adjustable walking canes
- Offset-handle canes
- Small-base and large-base quad canes
- Many folding travel canes
- Some heavy-duty mobility canes
Fixed wooden canes usually don’t have adjustment pins because their shafts don’t telescope.
How Does a Cane Adjustment Pin Work?

The pin works by connecting two telescoping sections of cane tubing. When the button enters an adjustment hole, it prevents the inner shaft from sliding farther up or down.
What happens when you press the button?
Pressing the button pushes it inward against its spring. Once the button clears the outer tube, the inner shaft can slide.
- Press the adjustment button fully into the shaft.
- Slide the telescoping section toward the desired height.
- Align the button with the nearest suitable hole.
- Release the button.
- Wait for it to project through the adjustment hole.
Medline instructions for adjustable canes describe the same basic sequence: loosen the collar, depress the push button, move the shaft, confirm full engagement, and retighten the collar.
What does the locking collar do?
Many canes have a threaded collar around the shaft near the adjustment holes. The collar reduces movement and helps secure the telescoping sections after the pin is engaged.
Important: A locking collar should not replace proper pin engagement. The push button still needs to extend fully through its adjustment hole.
How Do You Adjust a Walking Cane Pin Correctly?
Set the cane on a firm, level surface and wear the shoes you normally use for walking. Adjust the handle so it sits around the crease of your wrist while your arm hangs naturally.
Current MedlinePlus and Mayo Clinic guidance uses wrist height and a comfortable slight elbow bend as key fit checks.
Step-by-step cane height adjustment
- Stand upright. Keep your shoulders relaxed and your arm hanging naturally.
- Check wrist height. Note where the crease of your wrist meets the cane.
- Loosen the collar. Turn the locking collar counterclockwise if your cane has one.
- Press the adjustment pin. Push it far enough to clear the outer shaft.
- Slide the shaft. Move the lower section up or down toward the needed height.
- Align a hole. Let the pin enter the nearest suitable adjustment hole.
- Confirm engagement. Make sure the button is visibly protruding through the hole.
- Tighten the collar. Turn it clockwise until secure without forcing it.
- Test the cane. Apply light downward pressure before using it normally.
How much should your elbow bend?
Mayo Clinic currently describes a comfortable elbow bend of roughly 15 to 30 degrees when holding a properly fitted cane. Exact fit can vary with your body, shoes, posture, and reason for using the cane.
Clinical note: If you’re recovering from surgery, have significant weakness, or aren’t sure about cane height, ask a physical therapist or healthcare professional to fit the cane.
Section Takeaway: Adjust the cane around wrist height, make sure the pin fully engages, and tighten the collar before putting normal walking pressure on the cane.
How Do You Know the Adjustment Pin Is Fully Locked?
A properly locked adjustment button should visibly extend through the selected hole. The cane shaft should not slide when you gently push and pull the two sections.
Use this quick safety check
- Look: You can clearly see the rounded button outside the adjustment hole.
- Listen: Many models make a noticeable click as the button enters the hole.
- Feel: The shaft should stop moving once the pin engages.
- Check: The locking collar should sit snugly if one is fitted.
- Test: Apply controlled downward pressure before taking your first step.
Don’t rely on the click alone. A button can make noise before it has fully passed through the hole.
Safety warning: Do not use the cane if the button stays partly recessed, slips back inside, or allows the shaft to change length under light pressure.
Why Does a Cane Adjustment Pin Stick, Rattle, or Pop Out?
Most adjustment problems come from dirt, shaft misalignment, worn components, or a damaged internal spring. A loose collar can also make a correctly engaged cane feel noisier than normal.
The adjustment button is hard to press
- Dirt or dried residue may be collecting around the button.
- The two tubes may be pressing against the pin at an angle.
- The internal spring may be bent or corroded.
- The shaft may have been dented near the adjustment area.
Remove pressure from the cane before trying to move the pin. Slightly shifting the shaft can sometimes relieve pressure on the button.
The cane rattles while walking
A small amount of movement between telescoping tubes can create noise on some adjustable canes. First check whether the locking collar is loose.
Rattling becomes more concerning when it comes with visible shaft movement, damaged adjustment holes, or a pin that won’t remain fully engaged.
The pin keeps disappearing inside the shaft
A button that won’t spring outward may have an internal spring problem. The mechanism may also have shifted inside the tube.
I wouldn’t treat this as a minor inconvenience. The cane’s height-locking system is no longer dependable if the pin cannot stay engaged.
Clinical note: If a mobility aid feels unstable during use, switch to a safe alternative and have the cane inspected before relying on it again.
Can You Repair or Replace a Cane Adjustment Pin?
Some push-button assemblies can technically be replaced, but that doesn’t mean every cane should be repaired at home. The correct part must match the tube diameter, button size, spring shape, and adjustment-hole position.
When simple cleaning may be enough
If the pin works normally but feels slightly sticky, inspect the exposed area for dirt first. Wipe the shaft and button with a clean, slightly damp cloth and dry them thoroughly.
Don’t pour oil or lubricant into the tubing unless the cane manufacturer specifically recommends it. A slippery residue can attract dirt or affect other components.
When replacement is the safer choice
- The shaft is cracked, bent, or deeply dented.
- An adjustment hole has become stretched or distorted.
- The button repeatedly retracts while the cane is loaded.
- The locking collar no longer tightens.
- Replacement parts aren’t approved for your specific cane.
Practical rule: If repairing the pin requires drilling new holes, reshaping the shaft, or improvising a replacement button, replacing the cane is usually the more sensible safety decision.
Adjustment Pin vs. Twist Lock: What’s the Difference?
Push-button and twist-lock systems both adjust cane height, but they secure the shaft differently. Push-button systems use fixed holes, while twist locks rely more heavily on clamping pressure.
| Feature | Push-Button Adjustment Pin | Twist-Lock System |
|---|---|---|
| Height settings | Fixed adjustment holes | Often allows finer positioning |
| Locking method | Spring-loaded button enters a hole | Shaft is secured by twisting or clamping |
| Visual confirmation | Easy to see the button through the hole | Depends on tightness of the lock |
| Common adjustment spacing | About 1 inch on many models | Varies by design |
| Common issue | Sticky or incomplete pin engagement | Lock loosening or slipping |
Many medical-style aluminum canes use both a push button and an anti-rattle or locking collar. That combination gives you a positive mechanical stop plus extra shaft security.
How Should You Maintain the Adjustment Mechanism?
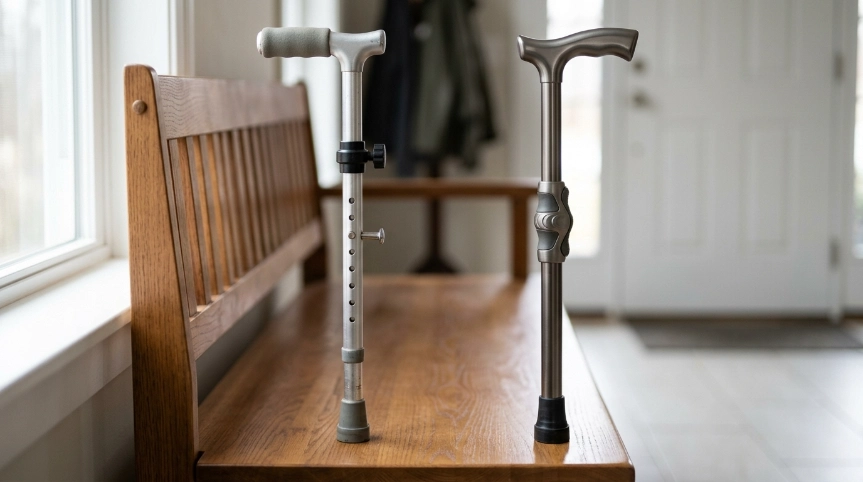
You don’t need an elaborate maintenance routine. A short inspection can catch problems before they affect the cane during walking.
Check these parts regularly
- Adjustment pin: It should move inward and spring outward without hesitation.
- Adjustment holes: Look for cracks, stretching, sharp edges, or distortion.
- Locking collar: Make sure it tightens securely and isn’t cross-threaded.
- Shaft: Check for dents, bends, corrosion, or unusual movement.
- Cane tip: Replace a worn, hardened, cracked, or badly damaged rubber tip.
- Handle: Confirm the grip remains firmly attached.
When should you recheck cane height?
Recheck the setting after someone else has used the cane, after travel, or whenever the locking collar has been loosened. It’s also worth checking after changing to shoes with a noticeably different sole height.
Mayo Clinic also recommends checking the rubber cane tip periodically because worn tread can reduce traction.
My routine: I recommend checking the button, collar, shaft, and rubber tip together. It takes less time than discovering a loose part after you’ve started walking.
Section Takeaway: A reliable adjustment pin should move freely, return fully, and hold the shaft without slipping. Regular inspection matters more than complicated maintenance.
Frequently Asked Questions
What is the button on an adjustable walking cane called?
It is commonly called an adjustment pin, push button, snap button, or push-button lock. Its job is to extend through an adjustment hole and hold the telescoping shaft at a selected height.
Should the cane adjustment pin stick all the way out?
The button should project far enough through the adjustment hole to clearly engage the outer shaft. Don’t rely on a pin that remains partly recessed or moves back inside when the shaft is tested.
Why won’t my cane adjustment button pop back out?
The tubes may be misaligned, dirt may be interfering with the button, or the internal spring may be damaged. Remove weight from the cane and inspect it before trying to use it again.
How high should my walking cane be?
A common fitting method places the cane handle around the crease of your wrist while you stand upright with your arm relaxed. When holding the cane, your elbow should have a comfortable slight bend.
What if the correct height falls between two adjustment holes?
Don’t drill another hole into the cane. Use the manufacturer’s available setting that gives the safest comfortable fit, or ask a physical therapist whether another cane offers a better adjustment range.
Is the locking collar enough if the adjustment pin is broken?
No. On a cane designed around a push-button lock, the collar should not be treated as a substitute for a working adjustment pin. Stop using the cane until the locking system is properly repaired or the cane is replaced.
How often should I inspect the adjustment pin?
Give it a quick check whenever you change the cane height and periodically during normal use. Check it immediately if you notice new rattling, slipping, sticking, shaft movement, or difficulty tightening the locking collar.
Final takeaway: The adjustment pin may be one of the smallest parts on your walking cane, but it directly controls the height lock. Make sure it fully engages, keep the collar secure, use a properly fitted height, and stop using the cane if the mechanism becomes unreliable.
